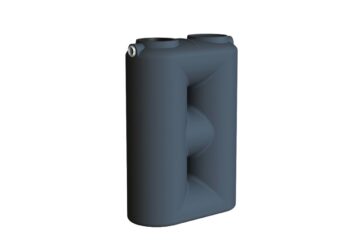
Our 1500L Slimline Water Tank is great for saving space beside your house. It is a narrow footprint, and measures 1460mm long x 680mm wide x 2050mm high, with a generous 1500 litre capacity. It is a trendy design and is super strong. This 1500L slimline water tank will look great beside any home or shed!
Features:
- A fantastic looking tank in the modern slimline style
- A 10-year manufacturers’ warranty for your peace of mind
- Long lasting durability with food grade material certified to AS/NZS 4766. It’s also UV resistant, so it can withstand lots of sunshine!
- A strong design with a self-supporting, domed roof
- A narrow footprint for saving space; it is only 680mm wide!
- Your choice of over 20 popular Colorbond colours to match your home! Check out the ‘Additional Information’ tab for the full list of colour options.
Fittings:
The inlet comes fitted with a 400mm mosquito proof leaf strainer at one end.
3x quality brass 25mm BSP outlets are moulded into the tank with one at each end at the base of the tank, and one at one end of the tank (opposite end to the inlet strainer) at bucket height.
An overflow provision is moulded into the tank at each end and a 90mm mosquito proof overflow is supplied loose.
Why do people buy slimline water tanks?
People mainly buy slimline water tanks because they don’t have the space for larger types of tanks. This is because slimline water tanks have a very narrow footprint and yet still offer large capacity in litres.
Another reason why slimline water tanks are popular is because of their aesthetic value. They are easy to blend or feature with new homes and some people even use them as a design element.
Installation
DISCLAIMER
Correct tank installation is the sole responsibility of the purchaser (Rotoplas does not install tanks).
Your rainwater tank should be installed by a licensed plumber with experience in rainwater tank installations.
It is important to follow installation instructions carefully as incorrect installation will void all warranty.
PRE-INSTALLATION CHECKS
✓ After unloading, inspect the tank for any damage during transportation and lifting. Should any surface
damage be evident, this must be reported to us before proceeding further with the installation.
✓ Installation should be carried out by experienced and qualified tradespersons.
✓ The installation of a tank for sewage or water storage may require prior approval of local authorities.
Contact your local council or relevant authority to ensure you meet all approval requirements.
✓ Make sure you have all the necessary equipment and supplies to complete the installation.
PREPARING A TANK SITE
When full of water, your rainwater tank becomes very heavy, and will need to sustain 1 tonne for every 1000
litres of tank capacity. It therefore requires a properly constructed and stable base.
The tank site must be flat and level, the area well compacted, and free from any rocks, stones, and sharp objects. It should be not subject to erosion or landslides. Modular tanks must be installed on a reinforced concrete slab to prevent movement.
A level, flat, reinforced concrete slab that is greater than the diameter of the tank is the ideal tank pad. A 75mm base of compacted crusher dust may also be used, ensuring that it is at least 600mm larger in diameter than the tank. If a material other than concrete is used, a retaining wall or surround must be provided to prevent erosion.
Installing your rainwater tank/s on an unstable base or below ground level will void your product warranty.
Ensure that the site is setback from any boundaries as required by local Council regulations and relevant building codes.
INSTALLATION
Using the tank overflow as a template, mark the size of the hole you need to cut in the side of your tank, then cut using a hole saw. Remove any loose shavings.
Ensure that the gasket is fitted firmly around the tank overflow fitting, then push it in place inside the tank overflow hole. Hold the overflow as you screw it in place, ensuring equal force is applied to each screw. Alternate between each screw, screwing on opposite sides, and avoid fully tightening the screws until they are all in place. Be sure not to overtighten.
Insert the Mozzie Stoppa screen into the gasket. Pipe the overflow well clear of the tank to avoid undermining of the tank base.
Direct the water inflow to the tank inlet strainer, ensuring that all pipe work is supported so that there is no added strain on the tank. Inlet pipe size must not exceed outlet pipe size. Where large volumes of water are present, it is advisable to consult a qualified hydraulic engineer.
Install a flexible hose of at least 300mm after the outlet valve before any other plumbing or pipe work to
absorb any shocks or movement.
POST-INSTALLATION
Some connections and/or fittings can be disturbed during transport and positioning. The installer must ensure that all connections, including those supplied by Rotoplas, are checked and watertight after installation. The installer must also ensure that all fittings, including those supplied by Rotoplas, are fit for purpose and suitable to the specific application of the client.
Once the tank is installed, it should be filled with at least 150mm of water, to hold the tank in place and
prevent it from moving or blowing.


