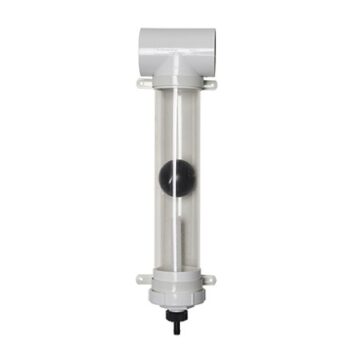
A 90mm Downpipe Water Diverter Kit will protect your rainwater supply by diverting any initial contaminants from your roof and ensuring a cleaner water supply flows into your tank. They are installed using a T junction inlet, which is fitted to the diversion chamber. The intial supply of rainwater enters the chamber, filling it and floating the ball to the top to seal the inlet. This means the rest of your rainwater, which is much cleaner, flows directly to your tank.
- 90mm diameter
- Improve the cleanliness of your water supply, which is especially important when you are using your tank for household water
- Automatic operation
- Kit contains all components required to convert your downpipe to a first flush diverter; including
- Ball Seat x 1
- Flow Control Valves x 8
- Plastic Filter Screen x 1
- Pipe/wall Bracket x 2
- Tee Junction x 1
- Sealing Ball x 1
- Screw Cap, Hose
- Connector & Socket x 1
Installation Instructions
Determine the length of 90mm pipe required for your first flush diversion chamber. As a rough guide: 1 metre of 90mm pipe holds approximately 5.9 litres of water. Ensure all cut edges are clean and smooth.
Attach the threaded coupling to your diversion chamber pipe applying solvent weld glue to the socket of the coupling and pipe, then push together and hold until the glue sets.
Select the appropriate flow control washer and fit it into the hose connector with the side marked “TOP” showing. Start by using the Control Washer with the smallest gauge hole (lowest number). Try a larger gauge Washer if experiencing blockages. Save the remaining washers for possible future use. Insert the plastic filter screen in through the base of the screw cap with O-ring seal and secure by attaching the hose connector and flow control washer.
Attach the screw cap with O-ring seal (and assembled components) to the threaded coupling.
Measure your existing downpipe and cut to create space for the T-junction. The outlet of your diverter must sit at least 150mm from the ground when fully assembled, so select your installation point and measure and cut accordingly. Ensure all cut edges are clean and smooth.
Connect the T-junction to the existing downpipe and install with solvent weld glue in the same manner as step 2.
Place the ball inside your first flush unit through the upper end of the diversion chamber pipe.
Insert the ball seat into the T-junction, with the narrow end of the seat facing down.
Apply glue to the T-junction and upper end of the diversion chamber pipe and insert the pipe into the junction and hard up against the ball seat, holding until the glue sets.
Position your assembled first flush diverter in place and attach to the wall using the supplied brackets, supporting the unit until it is fully secured. The upper bracket must sit directly under the T-junction, where it will hold the weight of the unit.


